Metals and alloys are some of the most abundant materials in manufacturing today. Current trends are using different processing techniques to maximize desired properties for individual projects. Metals and alloys are consistently used in construction, medical devices, manufacturing of small parts, and many other applications. At Ebatco, material testing is handled by our skilled team of laboratory scientists. Our laboratory scientists use the utmost care when handling customer samples, conducting material testing efficiently and accurately, and prepare professional reports that give results both numerically and graphically. The services and data that Ebatco provides will integrate well into any company’s development or verification plan.
For testing the hardness of a metal rod or observing critical stresses of a steel alloy, Ebatco can help. At Ebatco, we use our instrumentation to test and verify the micro- and nano- properties of a plethora of metals and alloys. We have the capability to test mechanical, chemical, and other properties to allow for better understanding of the capabilities of the product. Our scientists and impressive array of instruments will provide the most diverse and inclusive testing experience possible and will swiftly report the data back to the customer.
Comprehensive tests are performed on all samples, and our array of mechanical testing instrumentation can do just about everything needed – confirming coefficients of friction, material hardness, stress-strain curves, fracture toughness, and corrosion testing of material samples – and many other services can be done on-site by our team of expert scientists. If you have any questions about the services or instrumentation available at Ebatco, feel free to call or email and a member of our team will be able to further assist you.
Applications
Chemical compositions | Corrosion, fatigue, friction, oxidation, and wear | Failure mechanisms of stainless steel | Hardness of steels | Metallography |
Stress-strain curves |
For more information please read our application notes:
Fracture Failure Analysis of Steel Wire
Glass Transition Temperature Measurements Using Dynamic Mechanical Analysis
Light Load Reciprocating Wear of Computer Hard Disk Coatings
Melting Temperature and Latent Heat of Fusion of Indium
Micro Contact Angle Measurements on Single Particles, Filaments and Patterned Surfaces
Optical Inspection and Profiling of Defects on a Coated Wafer Surface
Scratch Failure Characteristics of DLC Coating on M2 Steel
Specific Heat Capacity of Refractory Material
SEM EDS Analysis on Scratch Failure of PTFE Coated Stainless Steel Guide Wire
Time-Temperature Superposition Using Dynamic Mechanical Analysis
Vickers Hardness Testing of Metallic and Ceramic Materials
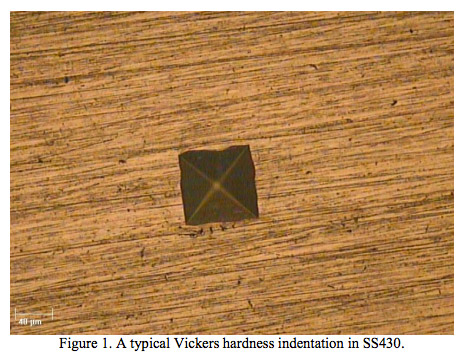
The Vickers hardness test was developed in 1924 as a method for determining a material’s hardness regardless of an indenter’s size. It can be used for most materials, irrespective of hardness, and has one of the widest scales among hardness tests. The test is governed by ASTM standard E384 for loads ranging from 1 gf to 120 kgf. A typical Vickers hardness indentation can be seen in Figure 1.
The Vickers hardness test is performed by pressing a diamond indenter tip in the form of a square-based pyramid into the sample at a specific load and then measuring the diagonal distances of the square indent that is created. The Vickers Hardness value, HV, is obtained via Equation 1,
where F is the indenting force in kgf and d is the average diagonal distance of the indentation in millimeters. The standard notation for reporting is HV followed by a number representing the indentation load in kgf. For example, 20 HV8 indicates a Vickers hardness value of 20 kgf/mm2 under a load of 8 kgf. Different indentation loads are selected depending on the thickness and volume of the sample that will be indented on.
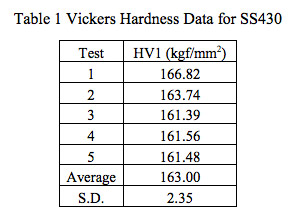
Vickers hardness testing is typically performed on samples that are too small or too thin to allow for testing using a different method. Stainless steel alloy 430 is frequently used as a thin protective liner for equipment used in moderately corrosive environments such as dishwashers, chemical processing equipment, heat exchangers, etc. As such, Vickers hardness testing is an appropriate method for testing SS430’s mechanical properties in many applications. Vickers hardness data for fully annealed SS430 obtained using a CSM Micro Indentation and Scratch Combi Tester (CSM Instruments, Switzerland) is given in Table 1.
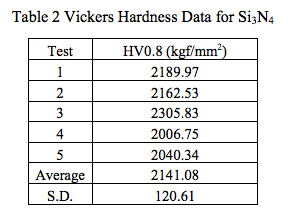
Vickers hardness testing is also frequently used to characterize ceramic materials. Silicon nitride, Si3N4, is an engineering ceramic that is prized for its hardness, low coefficient of thermal expansion, superior wear resistance and corrosion resistance. Since there are several different methods of processing Si3N4, a Vickers hardness test can yield valuable information regarding how the material was processed and its resulting properties. Vickers hardness data for Si3N4 obtained using a CSM Micro Indentation and Scratch Combi Tester is given in Table 2.